How to Create a jQuery Plugin
Tuesday August 27th, 2013There comes a time for every developer when the idea of another jQuery plug-in becomes momentarily unbearable. Searching and scouring the edges of the Internet for a plug-in that will fit your needs rots. Using a jQuery plug-in seems like a good idea, until you realize it can’t do everything you need it to. So I wrote my own jQuery plug-in.
Getting Started | Strict Mode | Variables | Functions | Options | Planning | Source Code
As a developer, I know that writing a jQuery plug-in is not always necessary. Quite often there is another developer out there who already created a plug-in that will suit my needs, but that hasn’t stopped me from creating jQuery plug-ins.
Occasionally, I run across a plug-in that does mostly what I want and can be adapted to fit my needs. Unfortunately, finding these plug-ins can be a pain and ultimately disappointing. It’s during these dark hours that you, as developers, should stop searching for “top jQuery plug-ins” and learn to create your own; if not for the needs of a project, then for the knowledge that comes with it.
In this post, I’m going to go over some of the things I’ve discovered while learning how to create my own plug-in that I wish had all been stored in one place.
Getting Started
The first few steps of learning any new skill can always be the most complicated. Sadly, the first step in creating a jQuery plug-in is no different: Coming up with a super awesome name. Reserving a class name for your plug-in can be a pain if you like to be clever (or maybe you’re so clever that it’s easy); either way, the first step is to have a name for your plug-in, which we will later use to call the plug-in. For this example, I am going to be super creative and name my plug-in “blogPost” (clever right?).
(function ($) {
    "use strict";

    $.blogPost = function(el, options) {
        var base = this;

        base.$el = $(el);
        base.el = el;

        base.$el.data('blogPost', base);

    };
})(jQuery);
As you can see, I set my clever name in line 4 to “blogPost” and, as with any good jQuery plug-in, options that can be overridden are enabled allowing the plug-in to be customized without changing the base code.
Things get interesting on lines 7 and 8 when I declare two states of the variable “base.” A common practice for jQuery plug-ins is the use of “$this” or “$(this)” or “$blogPost” to access a plug-in’s function and DOM, and there’s nothing necessarily wrong with any of those options. In this case, I set my DOM access to base.$el to avoid any sort of confusion with internal functions.
Now that we have the basic structure, we need to call the plug-in on the front end. Nothing’s going to happen just yet. We need to add some more code.
<!DOCTYPE HTML>
<html lang="en-US">
<head>
    <title>Blog Post</title>

    <script type="text/javascript" src="http://ajax.googleapis.com/ajax/libs/jquery/1.8.2/jquery.js"></script>
    <script type="text/javascript" src="jquery.blogpost.js"></script>
    <script type="text/javascript">
        $(function () {
            $('.blogpost').blogPost();

        });
    </script>
</head>

<body>
    <div></div>
</body>
</html>
Strict Mode
Now, you may be asking yourself what is this “use strict” thing on line 2? Chances are you aren’t, but I’m going to explain it quickly so that you know what it is and why it’s there.
Strict mode is a feature that places the browser in a “strict” operating mode (think transitional vs strict in xhtml). Now, strict mode offers a few nice features to help your plug-in:
- Catches common coding errors and throws exceptions.
- Prevents access to “unsafe” actions, such as gaining access to a global object.
- Disables poor or confusing features.
Most of this probably means nothing to you, and that’s fine. All you need to know is that adding “use strict” is generally a good idea when writing your jQuery plug-in. (If you want to know more, head over to John Resig’s blog post on Strict Mode.)
Variables
As with any jQuery script, accessing variables is important. We have two types of variables that we need access to. Knowing when to declare them and where can save us from several headaches down the road.
(function ($) {
    "use strict";

    // Global Variables
    var MAX_HEIGHT = 100;

    $.blogPost = function(el, options) {
        // Global Private Variables
        var MAX_WIDTH = 200;
        var base = this;

        base.$el = $(el);
        base.el = el;

        base.$el.data('blogPost', base);

        base.init = function(){
            var totalButtons = 0;
        };
    };
})(jQuery);
We’ve added a few extra things in this section. First, the addition of our “init” function; this will be the first thing called when our plug-in starts up. We’ll get more into function later on.
Also note that on line 5, we added a Public Global Variable. This means that this variable is accessible anywhere within the plug-in. On line 9, we added a Private Global Variable, which is accessible anywhere within the root of the plug-in (more later). Finally, on line 18, we’ve added a Local Variable; which is only accessible inside the “init” function.
When declaring your variables, consider what they are going to be used for and what needs to access them. If for any reason a user’s interaction needs to affect a variable that will be used throughout the plug-in, say on resizing the window, consider adding it as a public global variable. If it’s a variable that you need access to but the user doesn’t, go with a private global declaration. And finally, if a variable only needs to be accessed in a function and forgotten, then declare it as a local variable.
Functions
In a jQuery plug-in, there are two types of functions: public and private. In the previous example, we added an init function. This is what’s known as a public function.
A public function is accessible throughout the plug-in and by user interaction. In our example below, we add 2 new functions, and we set up our init function to actually do something.
(function ($) {
    "use strict";

    // Global Variables
    var MAX_HEIGHT = 100;

    $.blogPost = function(el, options) {
        // Private Functions
        function debug(e) {
            console.log(e);
        }

        // Global Private Variables
        var MAX_WIDTH = 200;
        var base = this;

        base.$el = $(el);
        base.el = el;

        base.$el.data('blogPost', base);

        base.init = function(){
            var totalButtons = 0;

            base.$el.append('<button name="public">Private</button>');
            base.$el.append('<button name="private">Public</button>');

        };

        base.clicker = function(e) {
            debug(e);
        };

        base.init();
    };
})(jQuery);
On line 9, you will see that I added a function called “debug” using the general format for a plug-in. This is a private function that can only be accessed by the plug-in.
On lines 26 and 27 we’re taking advantage of our plug-in DOM (base.$el) to add two buttons. Both of these buttons will attempt to do the same thing in order to show the difference between a public and private function.
Line 31 creates our third function called “clicker” which simply accesses the private function “debug.”
Finally, we call the init function on line 35. This will cause the function to run as soon as the page is loaded and will ‘init’ialize the plug-in.
Each of these functions will be passing in the DOM information from a click when their respective buttons are pressed. In order to access and read this information, we need to add a few things. Because the plug-in is contained, we have to control the actions separately.
(function ($) {
    "use strict";

    // Global Variables
    var MAX_HEIGHT = 100;

    $.blogPost = function(el, options) {
        // Private Functions
        function debug(e) {
            console.log(e);
        }

        // Global Private Variables
        var MAX_WIDTH = 200;
        var base = this;

        base.$el = $(el);
        base.el = el;

        base.$el.data('blogPost', base);

        base.init = function(){
            var totalButtons = 0;

            base.$el.append('<button name="public">Private</button>');
            base.$el.append('<button name="private">Public</button>');

        };

        base.clicker = function(e) {
            debug(e);
        };

        base.init();
    };

    $.fn.blogPost = function(options){
        return this.each(function(){
            var bp = new $.blogPost(this, options);

            $('button[name="public"]').click(function(e) {
                bp.clicker(e);
            });
            $('button[name="private"]').click(function(e) {
                bp.debug(e);
            });
        });
    };
})(jQuery);
At line 38 we introduce the section that allows us to control user input. If your plug-in needs to manage a click, resize, or perform any other interaction from the browser, this is where you will add that control. You will notice that we added two on-click functions for each of our buttons. Both of these actions have the same end goal: access the function “debug,” and print the click results to the console.
You’ll notice that our first button, declared on line 42, sends the DOM data from the click into the plug-in function “clicker.” “Clicker” then receives that data and sends it off to “debug,” which writes to the console.
Our second button, declared on line 45, takes the same DOM data from the click and attempts to send it directly to the “debug” function.
Test it out, and see what happens.
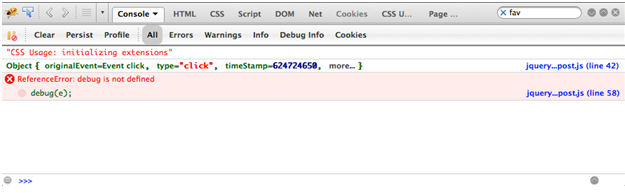
Well that was unexpected… or was it? Our first button, which is attempting to access our public function goes off without a hitch. But the second button, accessing the private function tells us that “debug” is not defined even though it clearly is on line 9.
Now, some of you may have noticed a slight difference in the two click functions. The button “public” is accessing “bp.clicker,” and the button “private” is clearly accessing “debug.” You may be saying “I don’t know what this “bp” is but it’s surely not referring to the oil company, so it must be why the second button doesn’t work.”
Well, yes and no. “bp” is assigned in line 40 to allow us access to the plug-in. It’s the same as declaring $this or using base.clicker. But because we are “outside” of the plug-in, we have to re-declare it. Let’s give that a shot. You’ll notice that bp.debug(e) is commented out on line 47, so remove that comment, comment out debug(e) on line 46, and give it another shot.
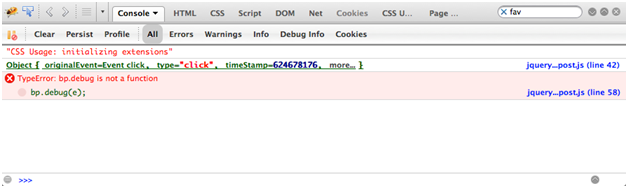
Huh… same thing, bp.debug is not a function. This is the difference between a private function, and a public function. Private functions are accessible in the plug-in root, by all of its methods, while a public function is accessible throughout the plug-in.
As with variables, you’ll have to plan out your functions accordingly. While it’s not difficult to change a private function to a public function, you’ll have to stop and think for a moment about what that function is going to be doing and if it should be public or private.
Options
One of the things that makes a plug-in truly great is the ability for any other developer to come along and customize certain aspects of it. When planning out plug-in options, it’s important to make sure that they aren’t restrictively flexible. Huh? Oxymoron anyone? What do I mean by that? Well it’s simple. Let’s say you’re making an image slider, and you want to allow people to control the delay between the images.
You don’t want to be restrictive and force your users into options like “fast” or “slow.” Yeah, they could have these types of options, and you could make as many options for these as you would like. But think about what goes into the back-end of converting “fast” or “slow” to a number value representing these options.
A better solution would be to simply give the user access to the direct delay value. Let’s compare.
base.init = function () {
    // slow / fast
    base.timeDelay(base.options.delay);

    // Direct Access
    base.animation(base.options.delay);
}

base.timeDelay = function(delay) {
    var speed;

    switch(delay) {
        case "fast" :
            speed = 300;
            break;
        case "slow" :
            speed = 800;
            break;
        default :
            speed = 400;
            break;
    }

    base.animate(speed);
};

base.animate = function(delay) {
    base.$el.find('button').animate({
        left: += 100
    },delay);
}
Simply restricting the user to two options adds another 16 lines of code. Just imagine how much unnecessary code there would be if you wanted to be restrictively flexible by having “super-fast,” “fast,” “moderate” etc…
Now, on to options; how do we add them, how does the user override them, how are they accessed? It’s surprisingly simple.
(function ($) {
    "use strict";

    // Global Variables
    var MAX_HEIGHT = 100;

    $.blogPost = function(el, options) {
        // Private Functions
        function debug(e) {
            console.log(e);
        }

        // Global Private Variables
        var MAX_WIDTH = 200;
        var base = this;

        base.$el = $(el);
        base.el = el;

        base.$el.data('blogPost', base);

        base.init = function(){
            var totalButtons = 0;

            base.$el.append('<button name="public" style="'+base.options.buttonStyle+'">Private</button>');
            base.$el.append('<button name="private" style="'+base.options.buttonStyle+'">Public</button>');

        };

        base.clicker = function(e) {
            debug(e);

            base.options.buttonPress.call( this );
        };

        base.init();
    };

    $.blogPost.defaultOptions = {
        buttonStyle: "border: 1px solid #fff; background-color:#000; color:#fff; padding:20px 50px",
        buttonPress: function () {}
    };

    $.fn.blogPost = function(options){
        return this.each(function(){
            var bp = new $.blogPost(this, options);

            $('button[name="public"]').click(function(e) {
                bp.clicker(e);
            });
            $('button[name="private"]').click(function(e) {
                bp.debug(e);
            });
        });
    };
})(jQuery);
You’ll notice that line 40 adds a new section where we list the default options. For this example, I’m only including two options, the default button style and a callback function, so something can happen after we click the button.
Lines 26 and 27 get a slight modification so that we can include the style. Here we’re accessing those options with the line “base.option.optionName.”
Finally, we’re making an addition to the clicker class. Line 34 calls the buttonPress option.
Now, none of these will change unless the user changes them. As you can see below, I’ve modified the jQuery call to the plug-in slightly, allowing me to override the default options.
<script type="text/javascript">
    $(function () {
        $('.blogpost').blogPost({
            buttonPress: function () {
               alert('Button was clicked');
            }
        });
    });
</script>
When all of this combined, what happens? Now when a user clicks on the buttons, the plug-in will make its call to debug, print something to the console and show an alert with a message.
Planning
If you’ve kept up with me this far, you’ll notice that a lot of planning goes into creating a jQuery plug-in; especially your first one. Often times, developers fall back on bad practices or aren’t entirely sure how to do something, and the more they try to rework the code, the messier it gets. The most important thing you can do before you begin is have a clear, focused idea of what you want your plug-in to do and go from there. Always ask yourself if what you’re adding is truly necessary or if there’s a better way to do it.
The World’s Most Boring jQuery Plug-in
We now have the lamest plug-in in jQuery history. If you want to download the files, you can view the link above. Hopefully this will act as a basic foundation for some of the most common plug-in features, including public and private functions, options, callbacks, and user input.
If you’re lazy (or efficient), like me, and you don’t want to type out a framework for every project, there’s a good resource over at pixelgraphics.us called Starter. This tool will let you set your class name, namespace, functions, and default options to build out the skeleton document for you. It’s a great way to start creating a jQuery plug-in.