Disclaimer: This article is about to nerd out on some code.
A few months ago, I wrote about how switching up my code editor helped to improve my personal workflow. Since then, we have made several changes at Brolik to improve our workflow as a company. Some of these changes include adding
Git,
SASS,
Compass, and
GitHub into our system for development and deployment.
While adding SASS and Compass was a fairly seamless integration, Git admittedly was a scary proposition at first, not only for myself, but for my co-workers as well. While I am very “techy,” they tend to lean more to the design side of the industry, meaning straying away from the norm and adding Git to a workflow can be difficult.
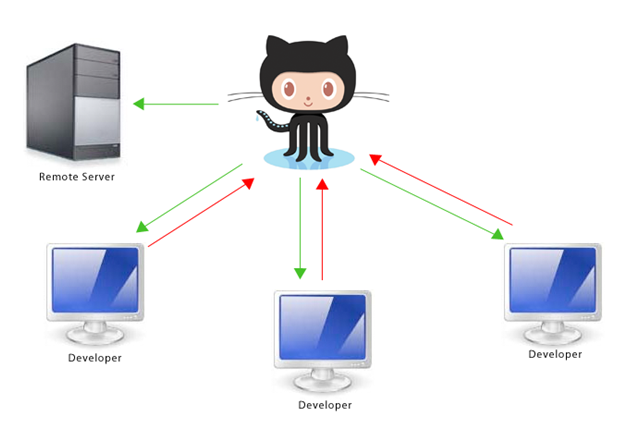
As soon as we overcame the learning curve included with Git, we ran into another potential hurdle: Git and GitHub offer great version control and management features, but how can we incorporate that into the deployment of our live sites so that we have these same features on the remote server?
In a normal workflow with Git, a team might work with their local repositories and sync up to a remote repository to keep themselves in check with the team. But this still requires someone to FTP all the files up to the server to test or push changes live. This is an unnecessary waste of time, and when time is money, wasting time is never a good thing.
After some extensive research into GitHub’s Webhooks and executing shell commands on the server, I found several scripts that, after combining a few, would allow us to keep our sites version controlled on our local machines and the remote server. Following some minor modifications to the files I found that I had a single file that could be uploaded to any remote server and with minimal customization would keep that server in sync with the repository. The file would automatically sync down any changes that were pushed to the GitHub repository to keep it in its most up-to-date status.
If you’re unfamiliar with GitHub’s Webhooks, you can read more about them
here. The short explanation is every time a push is sent to the remote repository on GitHub, it will post JSON data to the file you set in the Webhook containing all the information about the commit. We use this file to determine what exactly happens on the website’s server, however; some setup is necessary for the file to work properly.
Installation and Setup
Before we get into the actual file, some set up is required on the server so that it can function as a working repository. Servers today generally come on some form of the Linux kernel, which is great because they usually already have Git installed. In the event that your server doesn’t have Git installed, it’s simple to install on a Linux server.The first thing you’ll need to do is SSH into your web server through terminal. Generally the command is:
$> ssh username@domain.com
password: [your ftp password]
If this doesn’t work for you, check with your host for any special parameters that need to be set before you can SSH in. While it’s never smart to go poking around inside your server’s terminal with ROOT access, you might have to do so if you need to install Git. For the time being, though, just use your standard FTP account. And if you are having a hard time using
systemctl, then you may consider visiting the Linode homepage to learn more on this.
Once you are in the server, you can treat it just like you would any normal computer with Git. You’ll have to generate a public key and link that to your repository. This will allow the server to execute Git commands using PHP’s
shell_exec command.
Once you have the public key set up with GitHub, navigate to your domain folder (often it is domains/yoursite.com/or simply html). If you view the files here, you should see a folder called public_html or html. This is the folder where your files need to go, or in this case the repository, in order for it to show up on the Web. If the folder is empty, you can simply remove it using the command:
$> rm –rf public_html
For those of you that don’t know what this does, it recursively removes the folder and all its sub files and folders. THIS IS PERMANENT, so if you’re afraid of causing problems on the server, remember to make a backup (easiest way to do this is just to use
Filezilla or any other FTP program and download a copy first).
Once your working directory is gone, you can clone down your repository. Make sure you clone the correct branch and clone it into the correct folder. You can find the link to your repository on GitHub.

Copy that and include it in the following command:
$> git clone –b [branch name] git@[link from github] public_html
If the repository is large, it may take some time to download. Once it’s complete, you may have to change your thinking about the relationship between your computer, hosting server, and GitHub. I can best explain it by saying that you should now consider your hosting server to be another computer in your Git network. Once you can do this, trouble shooting becomes much easier.
Once your server is setup as a Git repository, you’re ready to set up the .gitignore!
Gitignore
Setting up this file is one of the most important things you need to do prior to adding files to your repository. Because of the way .gitignore works, it’s best to do it first thing. If you are unfamiliar with how a .gitignore file works, you can read up on it here.
The most important files to add to the .gitignore would be the following:
- Database settings file (username, password)
- File that contains a base URL (if you use perma or pretty links)
- Tractum.php
- Any folder or file that is dynamically updated on the server
#4 on that list can cause the most problems. If you’ve ever used Git and GitHub before, you know that you can’t make a git pull if you have modified files on your repository. The same concept applies here. Your server can’t have any files that are untracked or modified or else it won’t perform the pull.
Once your .gitignore is complete, you can safely FTP it, the tractum.php file, and any other files that need to be on the server but are not tracked by GitHub.
Configuring Tractum.php
All of this setup leads to the file that’s actually going to be handling the pulling on the remote server. The file will execute a single command on the server of “git pull” allowing the server to pull down any changes made. If you head over to the
project repository you can view and download the files. There are two files included, tractum.php which is the main file for handling each action, and capere.php which can be used if you have multiple servers.
When you open tractum.php, you’ll notice several settings at the top that can be set for your project. I will quickly run through what they are and their function in the file.
$projectName – This appears in an email header when an email alert is sent out.
$branch – The name of the branch your server is connected to. Because GitHub will send out a Webhook when a push is made to it regardless of the branch, we have to specify which branch we’re synced to.
$emailTrigger – You can set this to anything you like. At Brolik, we use (email). This means, that any time someone makes a commit where the message contains “(email)” everyone will get an email alerting them to the commit, as well as a list of all files edited.
$secondaryBranch[] and $secondaryURL[] – If you’re using a development environment and a live server, you can add the other branch names here. For example, if you use dev.yoursite.com and yoursite.com, with multiple branches called “master” and“Development,” you would set tractum.php in the dev server, set $branch to “Development”, set $secondaryBranch to “master” and $secondaryBranchURL[] to http://www.yoursite.com/ [ location of capere.php] Now, anytime a push is made to “master”, tractum.php will send a request to capere.php which will update yoursite.com, and any time a push is made to “Development”, tractum.php will handle it.
$team[] – Here you can set the email address of anyone that is working on the project. Those added to this list will receive an email update anytime $emailTrigger is included in the commit message.
The last two variables that need to be set are $salt and $pass. In order to have these generated, navigate to yourserver.com/tractum.php?passgen=[yourpassword]
The file will then give you the link you need to set your GitHub Webhook to, as well as the salt and password for the file.
And You’re Done!
If everything was done correctly, any changes you make on your local repository and push up to GitHub will automatically be pulled down onto the remote server, removing that unnecessary process of FTPing.
For more information and access to the files, head over to Remote-Server-Autopull. If you have questions or want to share your process for FTPing/publishing, leave a comment below.